
Building a PCB, or printed circuit board, assembly is a bit like putting together a puzzle. Every piece needs to fit just right. If you miss a step, the whole thing can fall apart. From the initial idea to the final board assembly, numerous opportunities exist for things to go wrong. But don’t worry, most problems are easy to spot and fix if you know what to look for.
Below, you’ll find the most common mistakes in PCB assembly and simple ways to avoid them. Whether you’re new to circuit board assembly or you’ve done it a hundred times, these tips will help you get better results every time.
1. Improper Component Placement
One of the biggest mistakes in PCB assembly is putting parts in the wrong place. Even a minor mix-up can cause short circuits, signal problems, or even damage the board.
How to avoid it:
- Double-check your design files before starting.
- Use PCB design software to visualise the layout of your board.
- Pay close attention to part orientation, look for pin one or polarity marks.
- After assembly, do a visual inspection to catch any misplaced parts.
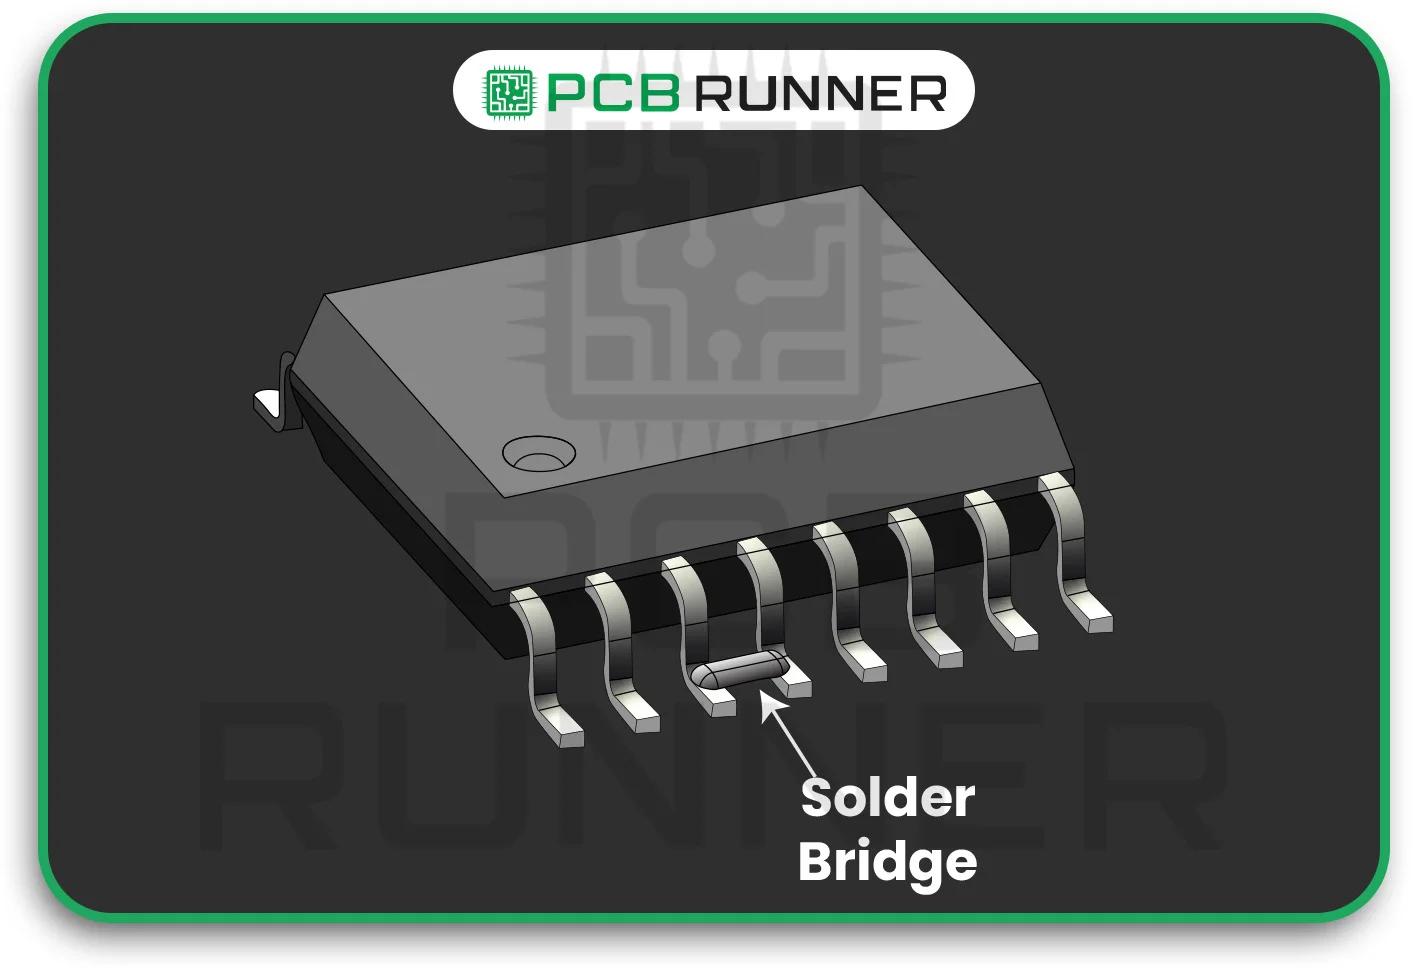
2. Solder Bridging
Solder bridging occurs when excess solder creates a connection between two pads or traces that shouldn’t be in contact. This can cause short circuits and device failures.
How to avoid it:
- Use the right amount of solder paste.
- Make sure your solder stencil has proper openings and spacing.
- Inspect your PCB prototype or finished board for solder bridges.
- Use a solder wick or sucker to fix any bridges you find.
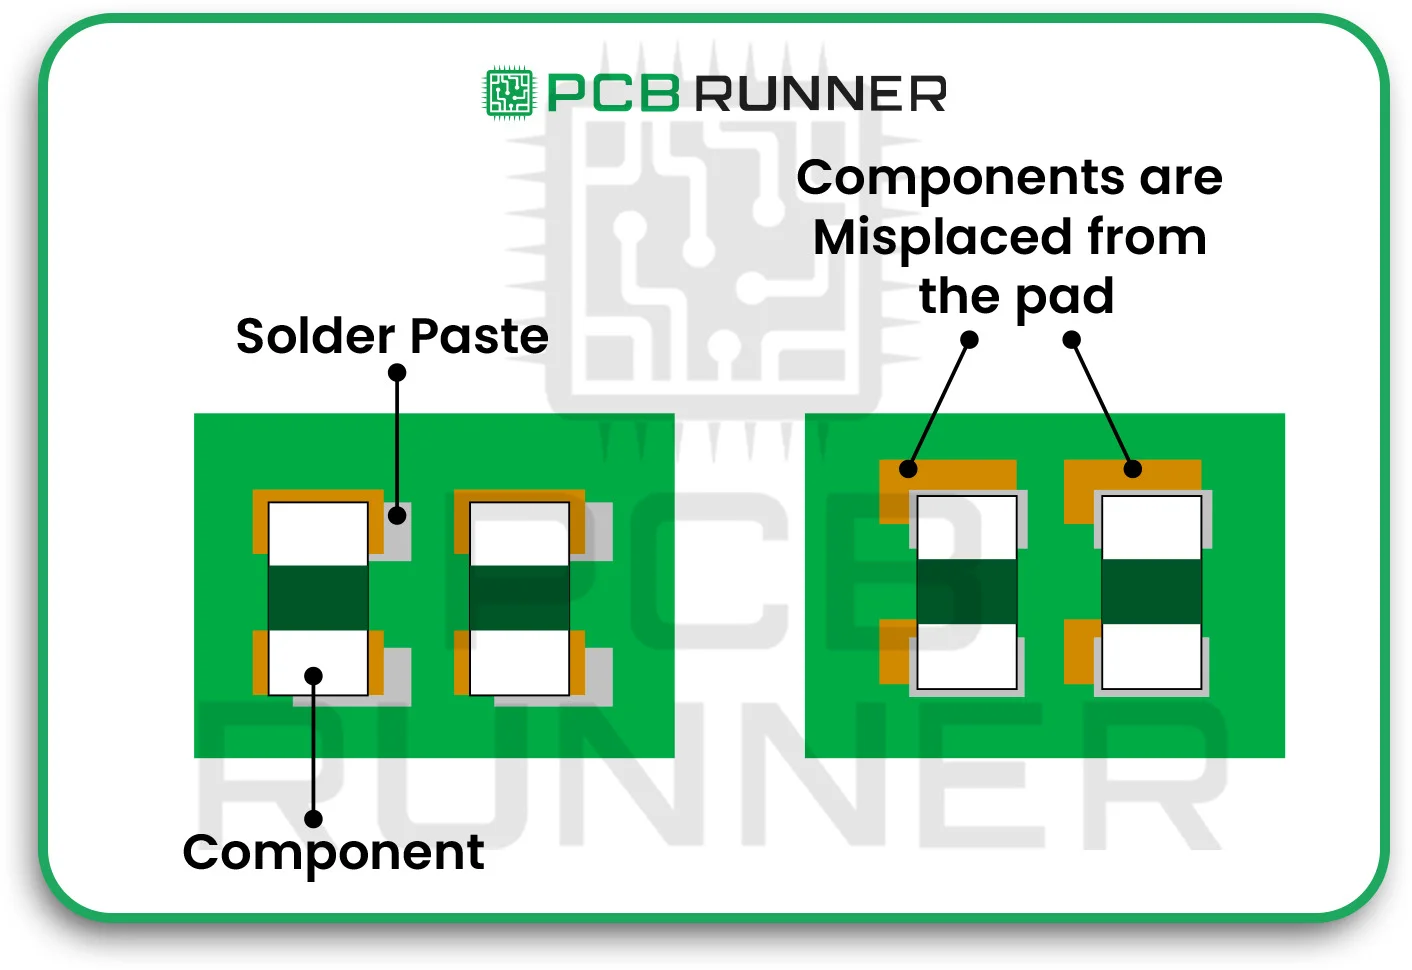
3. Component Misalignment
If a part isn’t aligned with its pads, it may not form a good connection. This can cause weak joints, signal issues, or even make the part fall off later.
How to avoid it:
- Calibrate your pick-and-place machines regularly.
- Use support systems to keep the board steady during the assembly process.
- Check placement accuracy before soldering.
- Do regular maintenance on your assembly equipment.
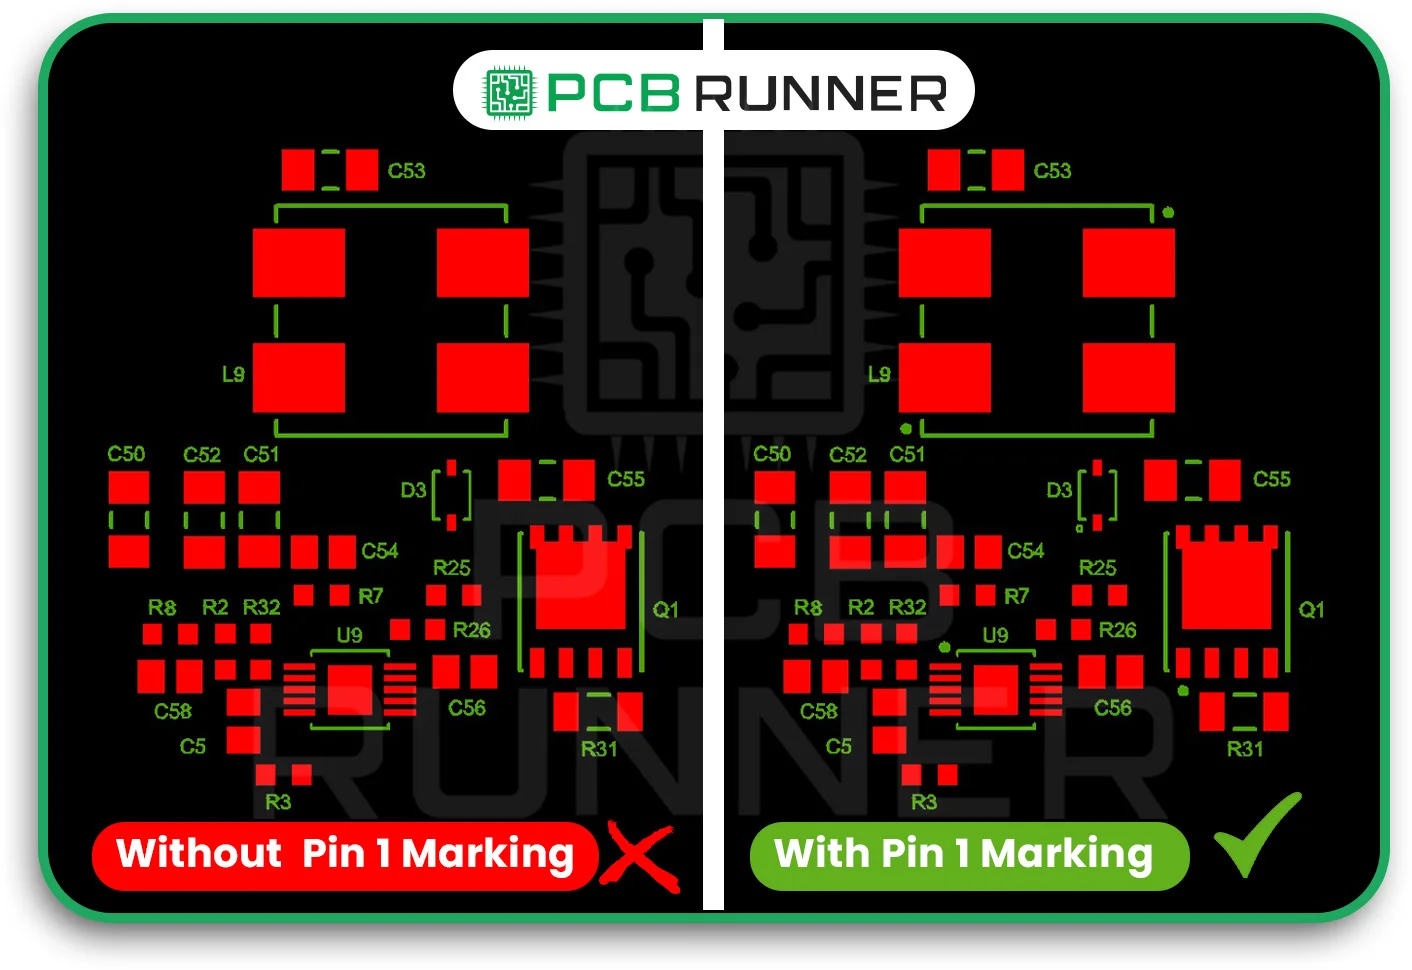
4. Incomplete or Incorrect Design Data
If your assembly team doesn’t have all the correct information, mistakes are bound to happen. Missing or unclear drawings, wrong part numbers, or missing polarity marks can all lead to trouble.
How to avoid it:
- Provide precise, complete assembly drawings.
- Include all part references, values, and special instructions.
- Ensure that polarity and pin one marks are clearly visible on your silkscreen.
- Double-check that your assembly notes match your PCB fabrication assembly files.

5. Insufficient Clearances
If traces, pads, or components are too close together, you risk short circuits, noise, or even manufacturing errors.
How to avoid it:
- Follow standard clearance guidelines for your board assembly.
- Use your design software’s clearance check tools.
- Don’t try to squeeze too many parts into a small space; leave room for safe connections.
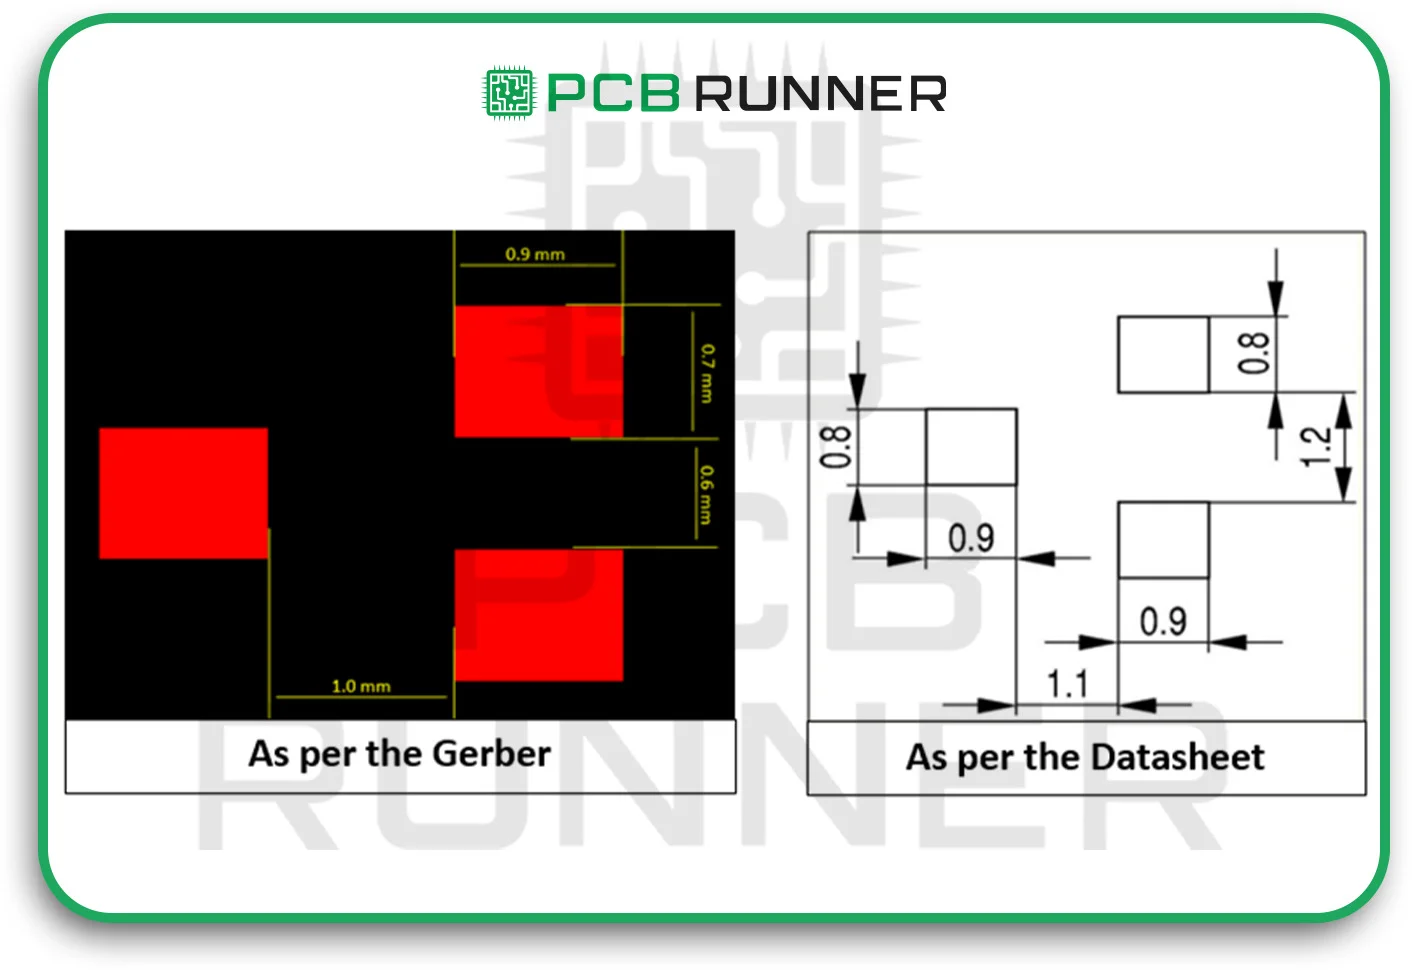
6. Incorrect Pad Sizes and Spacing
Pads that are too small can make weak solder joints. Pads that are too large can cause components to shift out of place during soldering.
How to avoid it:
- Use recommended pad sizes for each component type.
- Keep pad spacing within the limits set by your PCB assembly company.
- Test your design with a PCB prototype before full production.
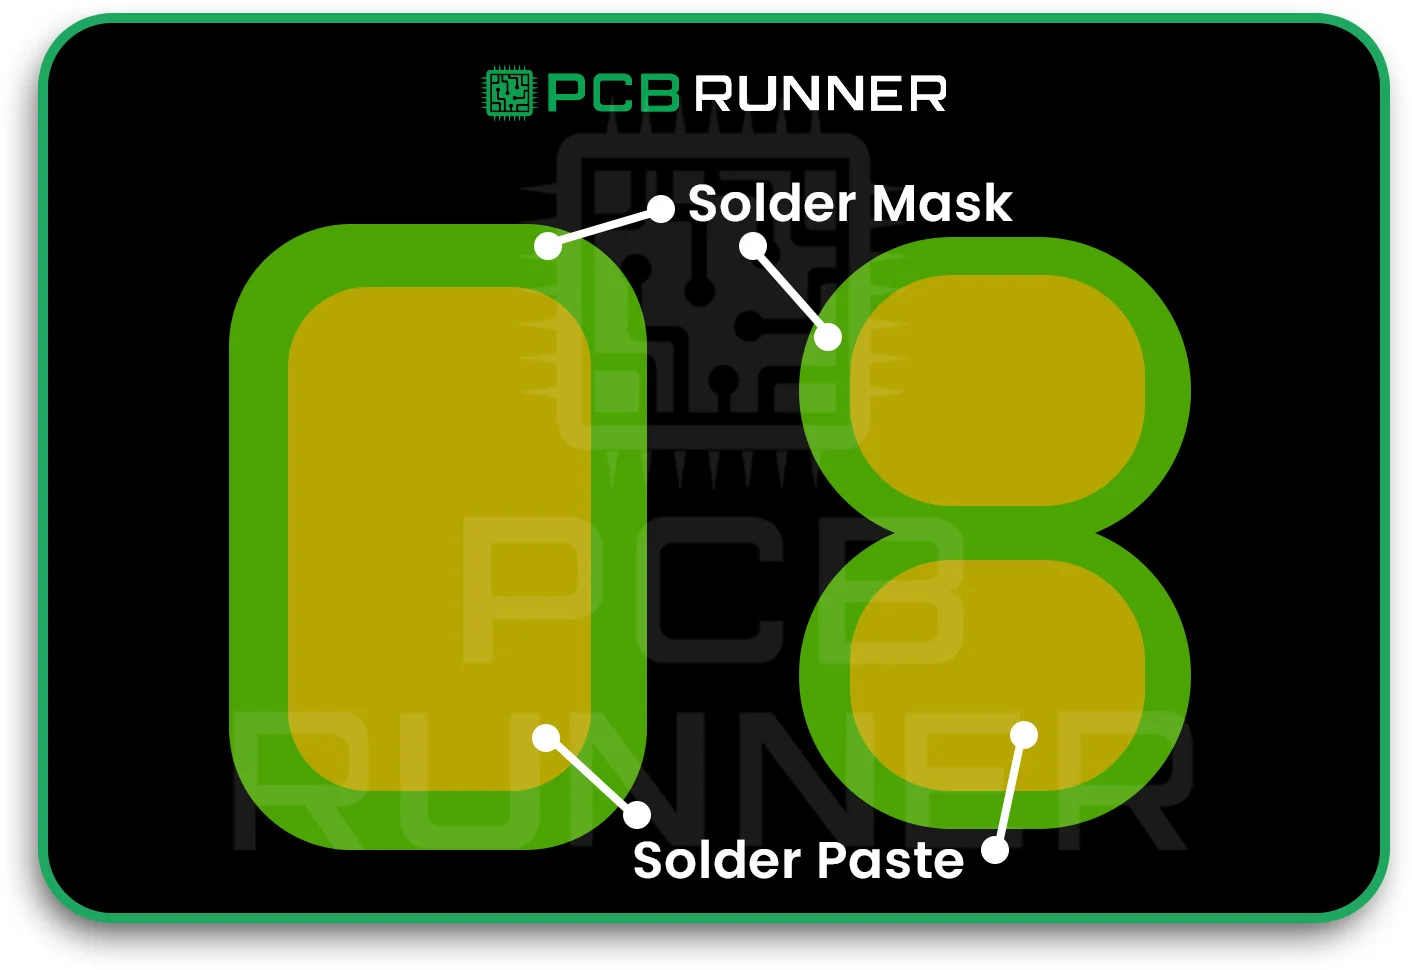
7. Solder Mask Errors
A solder mask keeps solder where it belongs. If the mask openings are incorrect, you may encounter solder bridges or exposed copper that can corrode over time.
How to avoid it:
- Ensure there’s sufficient space between mask openings and nearby pads or vias.
- Check for solder mask slivers, which can wash away during manufacturing.
- Review your design for proper solder mask coverage before sending it to PCB Assembly UK.
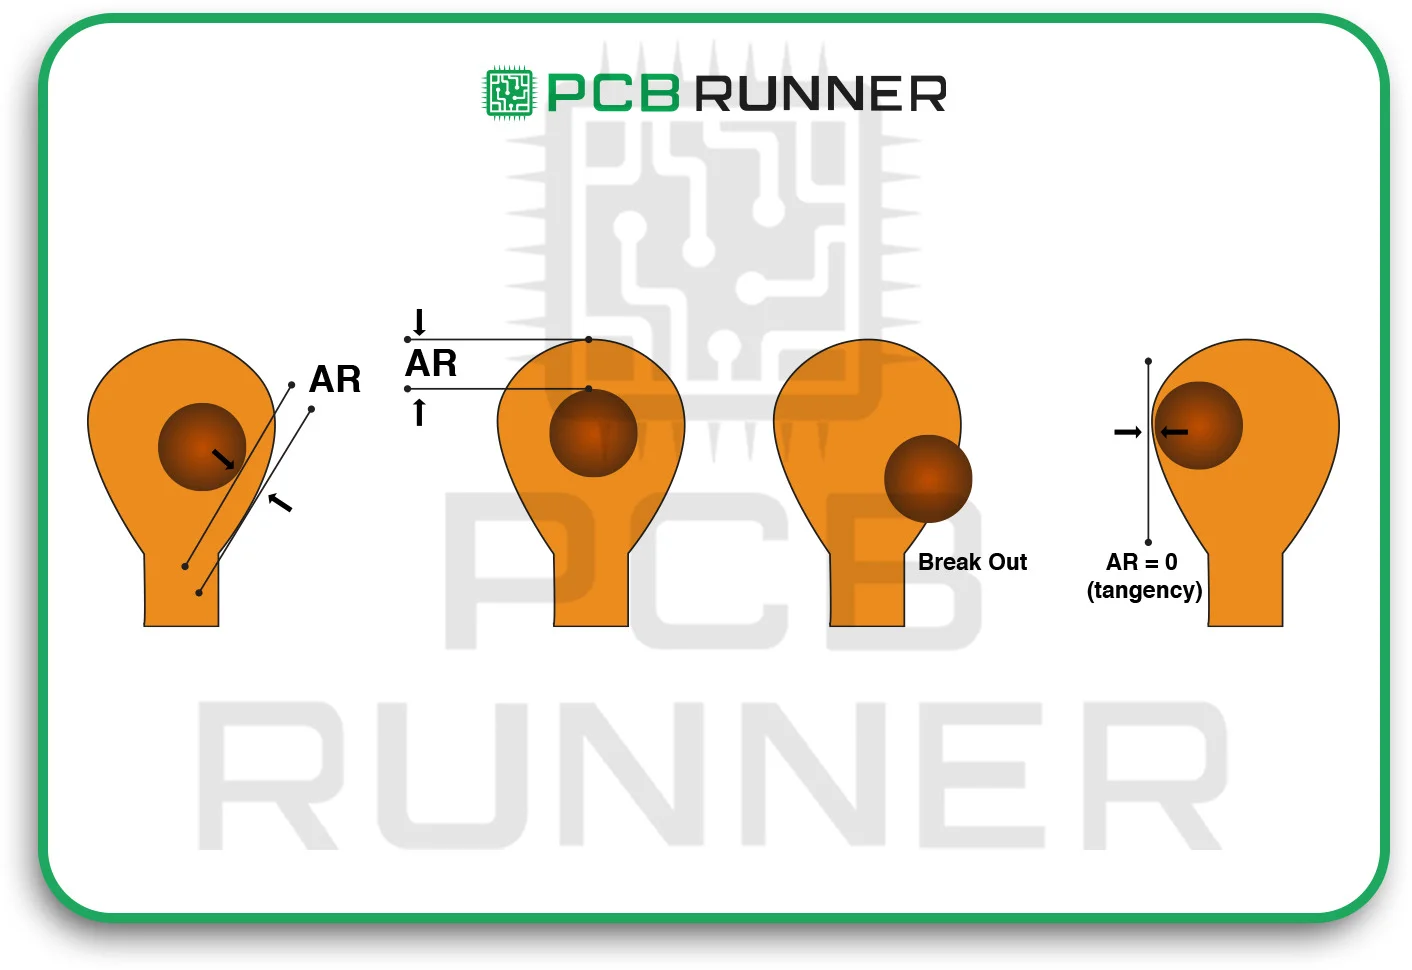
8. Drilling and Annular Ring Problems
Drilling holes for vias or component leads is a delicate process. If the holes are off or the annular ring (the copper around the hole) is too small, you can lose electrical connections.
How to avoid it:
- Follow your PCB and assembly supplier’s guidelines for hole size, ring width, and spacing.
- Avoid making holes too close to the edge of the board.
- Check your finished boards for missing or broken rings.
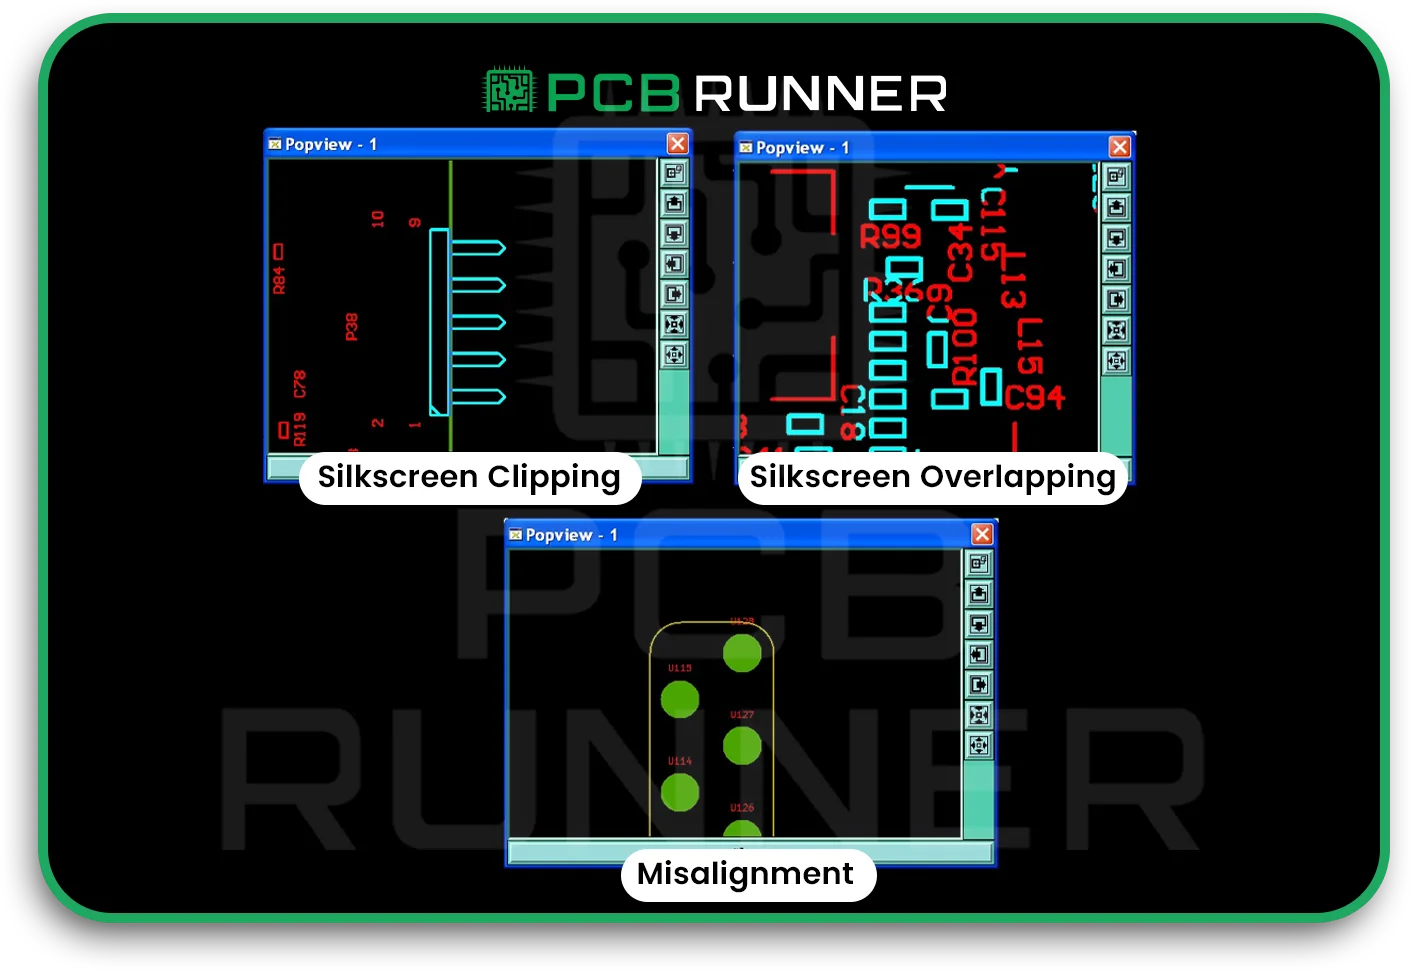
9. Silkscreen Mistakes
The silkscreen layer indicates the location and orientation of parts. If it’s missing or wrong, your assembly team might make mistakes.
How to avoid it:
- Ensure that all essential markings (such as polarity or pin 1) are clear and easy to read.
- Double-check that the silkscreen data matches your assembly instructions.
- Use high-contrast colours for easy visibility.
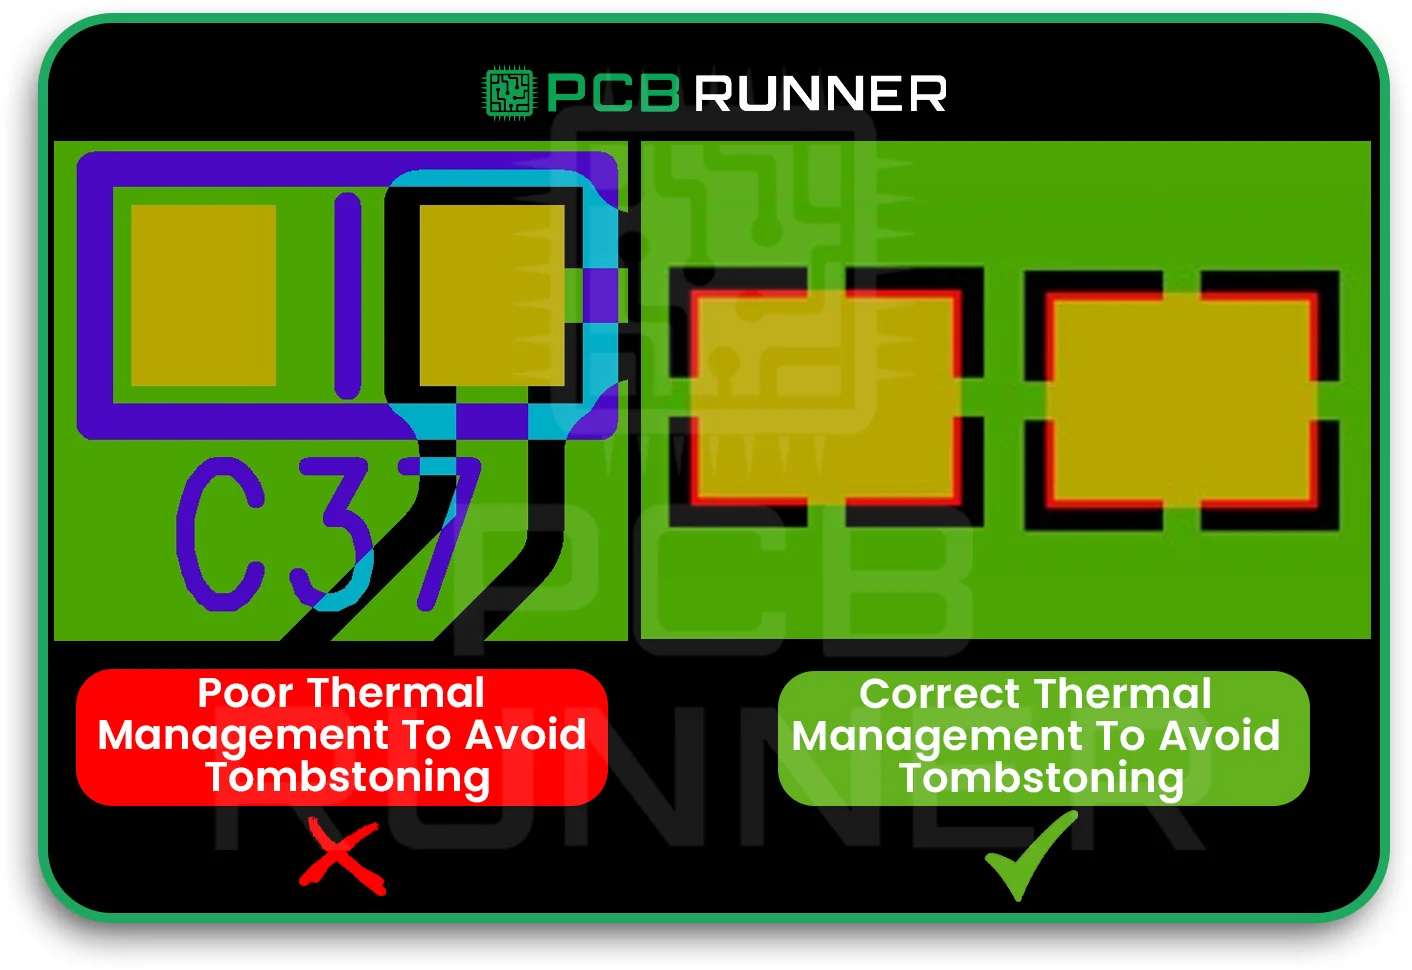
10. Poor Thermal Management
Excessive heat during soldering can damage your board or components. Not enough heat can lead to weak joints.
How to avoid it:
- Use thermal pads or heat sinks where needed.
- Control soldering temperatures carefully.
- Follow DFM (Design for Manufacturability) and DFA (Design for Assembly) guidelines to predict and prevent heat-related issues before assembly.
11. Skipping Design for Manufacturability (DFM) Checks
DFM checks help identify problems before your board enters production. Failing to perform these checks can result in costly mistakes and delays.
How to avoid it:
- Always run DFM checks before sending your design to a PCB assembly company.
- Utilise online tools or consult with your PCB assembly partner in the UK for assistance.
- Fix any issues found during the check, even small ones can cause significant problems later.
12. Not Testing Prototypes
Jumping straight to mass production without testing a PCB prototype can lead to disaster. Small mistakes can turn into significant losses if you don’t catch them early.
How to avoid it:
- Build and test a prototype before full production.
- Use your prototype to identify and correct assembly errors, design flaws, and any issues with real-world performance.
- Make changes based on your test results before ordering more boards.
Product Highlights: What Makes a Good PCB Assembly Process?
A great PCB fabrication assembly process is:
- Careful: Every step is checked and double-checked.
- Clear: All instructions and drawings are easy to understand.
- Flexible: Mistakes are identified and corrected promptly.
- Supported: Your PCB assembly company provides assistance and guidance when you need it.
Tips for Different Types of Projects
For simple boards:
Start with a PCB prototype to catch easy-to-miss mistakes.
For complex boards:
Work closely with your PCB assembly company to ensure every detail is correct.
For high-volume orders:
Utilise automated inspection and testing to maintain high-quality standards.
Final Thoughts
PCB assembly doesn’t have to be stressful. By watching out for these common mistakes and following simple steps, you can consistently build better boards. Take your time, review your work, and always test before scaling up. Your next circuit board assembly will thank you for it.

